

Painting your Toyota Land Cruiser at home can be a rewarding DIY project that not only enhances the vehicle’s appearance but also allows you to express your personal style. Whether you’re looking to freshen up a faded exterior, cover up scratches, or completely change the color, this guide will walk you through the essential steps and tips for achieving a professional-looking finish right in your garage.
Before you begin, it’s crucial to gather the right materials and tools for the job. Quality paint, primer, and clear coat are essential, but so are essential supplies like sandpaper, masking tape, and spray equipment. Understanding the painting process and preparing your Land Cruiser appropriately can make a significant difference in the end result.
In this DIY guide, we’ll delve into the preparatory steps, including cleaning and sanding your vehicle, as well as the technique of applying paint to achieve a smooth and durable finish. Armed with the right know-how and a bit of patience, you can transform your Land Cruiser into a stunning masterpiece that stands out on the road.
Preparing Your Land Cruiser for a Successful Paint Job
To achieve a flawless finish when painting your Land Cruiser, proper preparation is essential. Begin by selecting a suitable workspace that is well-ventilated and free from dust. Ideally, an enclosed garage or a shaded area outdoors is perfect for DIY projects. Make sure the temperature is moderate, as extreme conditions can affect paint adhesion and drying time.
Next, thoroughly clean the surface of your vehicle. Use soap and water to remove dirt, grime, and any previous wax coatings. Consider using a degreaser for tough spots. After washing, dry the vehicle completely with a clean microfiber cloth to avoid any moisture that could interfere with the paint job.
Inspect the surface for any imperfections like scratches, dents, or rust. For an optimal result, repairs must be done before painting. Sand down rough areas and fill in scratches with auto body filler. Once dry, sand the filler smooth and feather the edges to blend with the surrounding surface.
After repairs, it’s crucial to mask off areas that you do not wish to paint, such as windows, trim, and lights. Use painter’s tape and plastic sheeting to protect these parts. Ensure that the tape is applied securely to prevent paint from seeping underneath.
Finally, lightly sand the entire area to be painted using fine-grit sandpaper. This step promotes better paint adhesion. After sanding, wipe down the surface with a tack cloth to remove any dust particles. Following these steps will set you up for a successful DIY paint job on your Land Cruiser, ensuring a smooth and durable finish.
Choosing the Right Paint and Tools for Your DIY Project

When embarking on a DIY project to paint your Land Cruiser, selecting the appropriate paint is crucial for achieving a professional finish. Automotive paints are specifically formulated to withstand the rigors of outdoor conditions, including UV rays, moisture, and abrasions. Look for high-quality products such as acrylic enamel or urethane paints, which offer durability and gloss retention. Additionally, ensure the paint you choose matches the original color or suits your personal style.
Preparation is key, so having the right tools on hand will make the painting process smoother. You’ll need a variety of brushes, rollers, and spray guns. For larger surfaces, a spray gun can provide an even coat and reduce application time. Invest in high-quality primer to prepare the surface, ensuring better adhesion and a uniform finish. Tape, drop cloths, and sandpaper are also essential to protect surrounding areas and create a clean workspace.
Taking the time to select the right paint and tools is vital in any DIY project. By choosing products designed for automotive use and equipping yourself with appropriate tools, you can achieve stunning results that enhance the look of your Land Cruiser. Plan ahead, and ensure you have everything ready before starting your painting adventure.
Applying the Paint: Techniques for a Flawless Finish
When it comes to painting your Land Cruiser at home, mastering the application technique is essential for achieving a professional look. Begin by ensuring your workspace is clean and well-ventilated. This not only enhances your comfort but also prevents dust and debris from ruining your paint job.
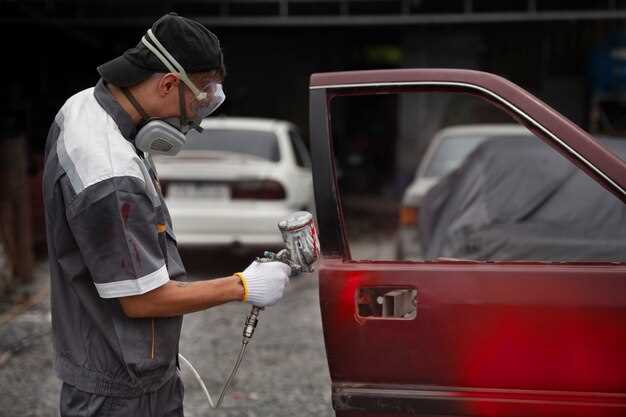
Before applying paint, choose the right tools. A high-quality spray gun or paint sprayer offers better control compared to traditional brushes or rollers. If opting for a can, use a spray nozzle that disperses the paint evenly. Practice your technique on a scrap piece of metal to familiarize yourself with the sprayer’s settings.
Start with a primer specifically designed for automotive surfaces. Apply it in thin, even coats, allowing each layer to dry completely before applying the next. This helps in filling small imperfections and provides a better surface for the paint to adhere to.
Once the primer is dry, proceed with your chosen paint. Shake the can or sprayer thoroughly to ensure even consistency. Hold the sprayer approximately 6-8 inches away from the surface and apply the paint using a steady, sweeping motion. Overlap each pass slightly to avoid streaks, and avoid concentrating too much paint in one area to prevent runs.
Apply multiple thin coats rather than one thick coat. This technique allows for better adherence and a smoother finish. Be patient; allow adequate drying time between coats as specified by the paint manufacturer. This ensures that each layer cures properly, resulting in a durable finish.
After achieving the desired color depth, a clear coat can be applied to enhance the gloss and protect the underlying paint. Follow the same application techniques used for the paint. Ensure that the clear coat is compatible with the paint used and allow it to cure fully to ensure longevity.
Finally, once the paint and clear coat have cured, consider polishing the surface for an added shine. This step can help eliminate any small imperfections that may have occurred during painting. With patience and attention to detail, your Land Cruiser will have a flawless finish that enhances its aesthetic and protects it from the elements.